As we have learned from the previous article on hacking it is understood that we cannot use windows Operating System for hacking. To start hacking it is very important to have a machine which has an Operating System which is capable of providing some power tools that assist in hacking.
Linux distros like Backtrack or Kali are essential in building a hacker machine. You can have a dual boot Operating System or personally I would suggest a virtual machine. Installing a Linux Distro in a dual boot environment is much easy. Recognizing hardware and installing drivers automatically makes installation process simple.
Choosing you Virtual Machine Software:
There are many paid and free VM applications available. Hyper-V is a VM that is integrated with Windows 8. Installing Linux distro on Hyper-V is recommended if you are accessing internet via LAN. USB support is not available on a Hyper-V virtual machine.
Oracle VM VirtualBox is something that really works great in all scenarios. The configuration is easy and so installing any guest OS can be easily accomplished. However we would discuss the advantages of VirtualBox against some other VM sometime later.
Installing Kali Linux on VirtualBox:
1) Download and Install Oracle VM VirtualBox on the host machine.
2) See to it that you don’t have another VM running. Parallel VM’s do not allow Amd64 installation so disable Hyper-V or any other VM if Installed.
3) Open the VirtualBox and click on New. Enter the VM Name of your choice. Select type as Linux and version as ‘Other64 bit’ as I am using ‘Kali AMD64 bit‘. Click on Next.
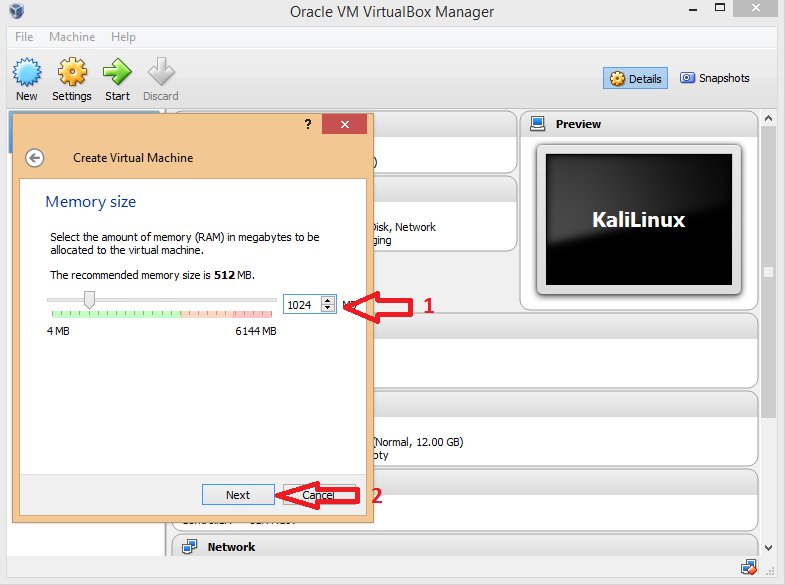
 4) Select 1024mb Ram Size.
 5) Select ‘Create a Virtual Hard Drive Now’ for installing Kali Linux on VirtualBox.
 6) Select ‘VirtualBox Disk Image’. Click Next.
 7) Choose ‘Dynamically Allocated’ and Click Next.
 8) You can keep the settings as it is and Click ‘Create’. This will create your Virtual machine and configure virtual hard disk.
 9) At this point you have built a virtual Machine with a virtual hard disk and ram. Now we need to fine tune this machine according to our requirement. To do this Click on ‘Settings’. Click on ‘General’ and check if your VM is created.
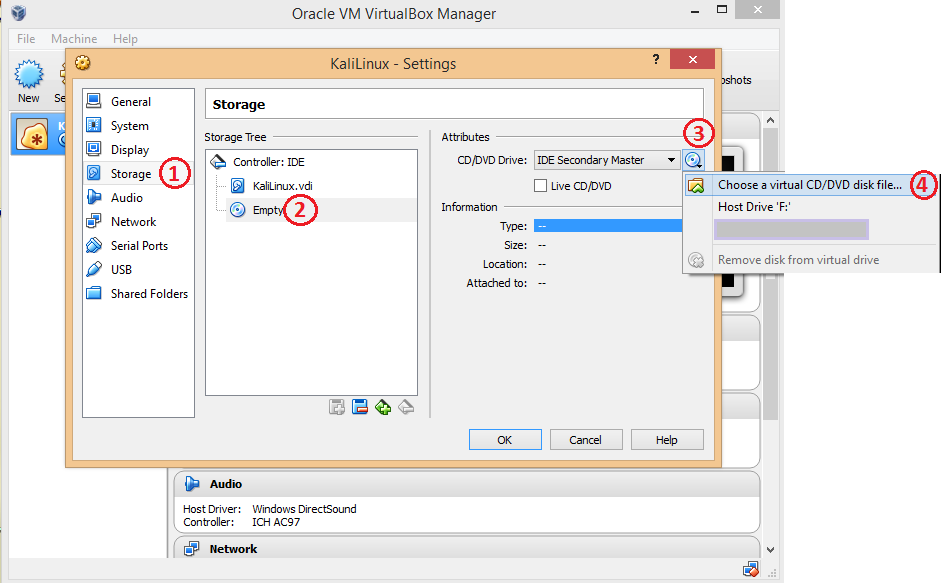
 10) Click on ‘Storage’. You can mount your *.iso as the virtual cd/dvd. Please follow the steps 1 to 4 as shown in image below.
 11) Locate and Select the Kali Linux iso file from your local hard disk.
 12) Make changes to the ‘USB’ settings as follows.
 13) Click ‘Ok’. You will now have your virtual machine booting from Kali Linux iso. You can either use live Kali Linux or install it on the VirtualBox.